
Attic Piping
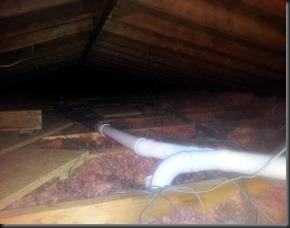
Recently, I was called out to evaluate a Eureka central vacuum system in Naperville, IL. The owner indicated that the system “just didn’t work right” and she wanted me to check it out and see what was wrong. Inspection of the piping system revealed a very poor installation. Look at the way the piping for the second floor inlets was routed through the attic:

Where to start…first, the fact that the pipe is running about a foot off the surface of the joists makes it difficult to maneuver around, difficult to insulate, and prone to sagging (as evident in the gray piece). The tee connection to the right of the photo is a “drop-out” (we can assume the installer was also) – it allows debris traveling to the power unit to collect in the branch line below the inlet. Fortunately, since many of the connections in this system had never been glued, this was easy to correct:
Fixing this involved cutting the risers to slightly below the surface of the joists, then gluing 90 degree elbows in place. Note the horizontal 90 elbow leading into a 45 degree wye: This arrangement ensures no debris remains in the tubing system, reducing the potential for clogs.
Not shown is the final step of adding loose fill insulation to cover the pipe, which prevents condensation buildup in the wintertime. Much easier now that the pipe lays flat on the attic floor.
Here’s a shot of one of the basement lines from the same system:

Not one, but TWO drop-out points for debris to collect. Dirt would pour out of the inlet on the left whenever it was opened. I didn’t take an “after” shot once the tubing was re-done properly (nor did I document the many tight 90-degree turns that were taken out and replaced by the proper sweep 90s), but needless to say, this system is working much better now.